New Fedora 18 Anaconda Installer – Sexy but Frustrating

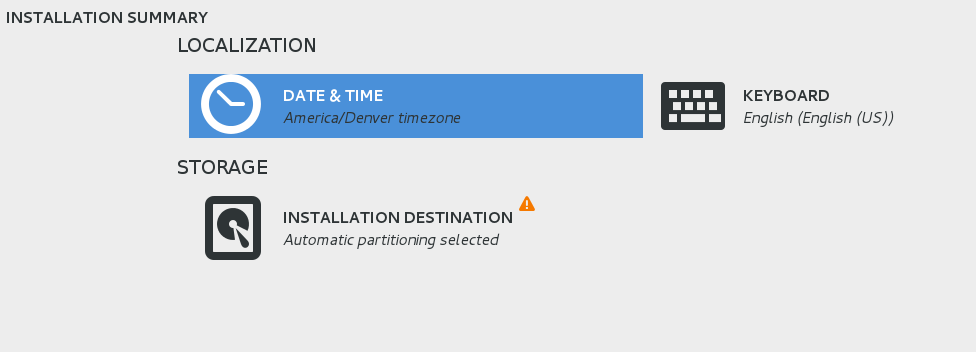
Fedora 18 Anaconda Installation Summary Screenshot
The new Fedora installer, Anaconda, looks beautiful. Unfortunately, I wasted a lot of time trying to figure out how to do something I expected to be commonplace. Here’s how it went down.
Existing Configuration
- Dual boot with Windows 7 and Fedora 15.
- 2TB HDD configured with NTFS partitions for Windows, an ext4 boot partition and LVM2 volume group for F15 – 3 LVs – home, swap and root.
What I Wanted to Do
Preserve my /home lv and my ntfs partitions. Nuke everything else and install Fedora 18. Pretty straightforward, right?
The First Hurdle
The first several screens were what you might expect – time zone, keyboard, nice splash screen. By the time you arrive on the “Installation Summary” screen, pictured above, you are probably enjoying the experience-the aesthetics are pleasing. It just feels good.
And then it happened…
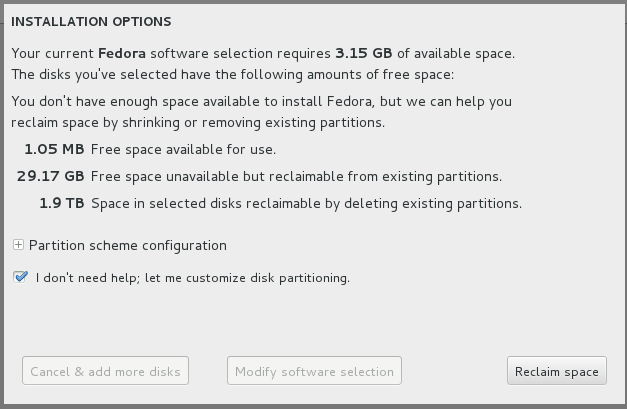
After clicking “Installation Destination” to presumably to setup my partitions, I get this dialog box:

Huh?
My Beef With this Dialog
- First off, why in the hell would you ever layout information about a hard drive’s size/space/partitions in a paragraph? That is tabular data, best represented in a clear, no frills grid. Some data presentation is better left cut, dry and to the point.
- The first thing I read: “3.15 GB of available space.” Great, it thinks I have enough space, even though that number is totally wrong, I have 100s of free GBs available. Whatever. Moving on. Still mentally off frolicking in “PreTTyNewOS Install Land™”.
- The second thing I read: “1.05 MB Free space available for use.” Wait, what? *eyes dart back up to read the first line* Oh, I guess I misread that. It NEEDS 3.15 GBs to install.
- I continue on…eyes jump back down to “29.17 GB Free space unavailable but reclaimable…” Whatever that means…
- “1.9 TB Space in selected disks reclaimable by deleting existing partitions.” And by that it means “Your HDD is 1.9TB” Of all of the important variables to consider when installing a new OS, the one I seldom care about is hardware, given that at this stage in the process, I would have already made any necessary hardware modifications, such as installing a new HDD. So really, this should not be bolded and grouped in such a way that it appears to be of the same level of significance as an incredibly more important piece of information such as “you do not have enough HDD space, please fix this”.
“You do not have enough HDD space available.” That is all I needed that dialog to tell me. Forget the rest of it. Whew! Now that I understand what it is trying to tell me, what are my options?
- “Cancel & add more disks” – Odd. I am not sure what this “upgraded” cancel button will do if I were to click it. Surely it must be more than just a standard cancel button, otherwise it would simply say “cancel”, right? Will it back me out of the installation, shutdown my PC and hand me a screwdriver? Because, that is the functionality I have come to expect out of all the other “Cancel & add more disks” buttons out there. Precedent, yo.
- “Modify software selection” – This is disabled regardless of what I do, so I guess it doesn’t want me to do that…
- “Reclaim space” – Uh, last time this dialog box had the word “reclaimable”, you know, up there a few lines, it was followed by the phrase “by deleting existing partitions” so this button probably means “Format HDD-Lose all stuffs…” There is no way I am ever clicking that button. Why is it even there? Did someone really put an “auto-screw-with-my-partitions” button on this dialog box?
- At this point I am getting desperate. I have lost the happy-go-install feelings of late. I have scanned the important looking items on this dialog, and then looked at my two actionable options. Nothing seems like a clear choice. I am starting to lose faith in this dialog box’s ability to meet my installation needs.
- Suddenly, when hope had all but been lost, I see: “I don’t need help; let me customize disk partitioning…” Now, that is my kind of checkbox! I quickly check the box and prepare to move onto managing my partitions!
- Are you kidding me? The result of that checkbox was greying out the “Cancel & add more disks” button, leaving me alone in the room with what I am perceiving will, once clicked, send the grim reaper of data destruction after my precious bits. No! Bits! I love you!

I sat here for a good 5 minutes wondering if I should click this button.
Finally, I decide to dive in and live a little. Nothing like a little data loss to go with your freshly installed OS. Reminds me of Windows! I click it. Success! I am brought to a screen that looks like a partition manager. I didn’t screenshot this part because I didn’t think I would need it, seeing as it should have been trivial from this part forward.
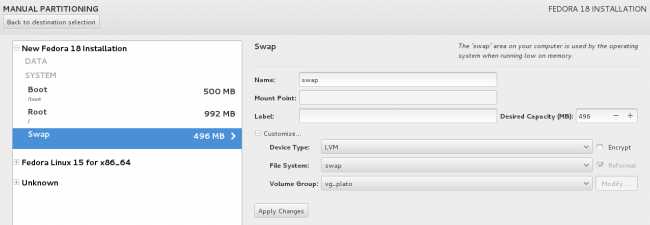
In the left-most column are three headings: “New Fedora 18 Installation”, “Fedora Linux 15 for x86_64″ and “Unknown”. The last is my Win7 installation and the other two are exactly what they sound like. Now, my home partition is under the Fedora 15 header, so I try moving it to the Fedora 18 header. No luck. I continue to mess with the settings until I finally result to googling for an answer. On a page I can no longer seem to find(I wanted to credit it with a link), at the bottom, I discover an incredibly helpful, yet obscure comment that helps me figure out how to use this screen.
The Secret
Prepare for a “derp” moment… Type the mount point into the “Mount Point” field. The partition will then place itself under the “New Fedora 18 Installation” header.
Yep, that easy. I couldn’t believe I didn’t try that…
To nuke a partition, select the partition on the left. Enter the mount point, if you have not already. Then, expand “Customize”. Check “Reformat” and verify that the volume group is correct.

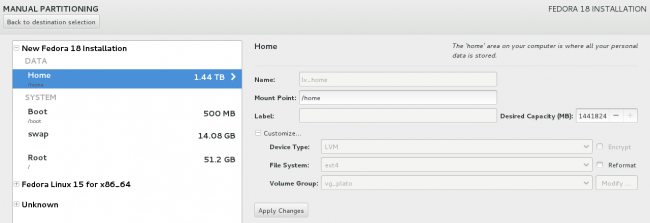
Showing the partitions to be reformatted now appearing under the Fedora 18 header.

Yay! My /home is under the correct header!
Installation Complete!
Once the partitions were under the correct headers with the correct mount points and volume group selected, it really was smoother sailing. I left to run an errand, and when I came back Fedora 18 was waiting for me, along with all of my precious bits. I missed you guys!
In all seriousness, I think that the issues, thoughts, and feelings I described above, albeit somewhat melodramatically, could be combined to form the antithesis of the good user experience. I think this is also a great example of how designers and developers have to be diligent about carrying through good UI practices through every part of every workflow in a program.
What do you think? Did you find this helpful? Please share your thoughts in the comments below.